The problem is that my nice new EVGA brand video card (with NVIDIA GPU) is not natively supported by Linux, so you have to download and install the drivers from the NVIDIA website. A current driver as of this writing can be found at http://www.nvidia.com/object/unix.html (it might be easier to google "nvidia linux driver download" than to directly navigate the NVIDIA website). Look under the "Linux x86_64" category. I always choose the "Latest Short Lived Branch" since it will have the most bug fixes (e.g. Latest Short Lived Branch version: 349.16). Download this file to your computer, the do a power-off restart.
The power-off part here is important. In configuring the video card, we have a fundamental conflict between the motherboard's built-in video output and the "non-standard" video card output. When you perform a fresh Linux install or upgrade the OS kernel, you are starting from ground zero and the video card will no longer work. Unfortunately, the Ubuntu software update system seems to come up with a semi-major patch every month or two which requires the re-installation of the video drivers. While I could avoid the problem by refusing to perform software updates, I am always eager to get bug fixes and new features in all my other packages, and I just try to minimize the inconvenience of re-installing the video card driver on the new OS kernel.
The problem is that, when the video card quits working, you can't tell what is going on, much less fix it! The following steps are the fastest way I've found to get around these difficulties.
My video card has three (yes, count 'em, three!) video outputs, and I have become addicted to using all three monitors. Yes, I know, it might seem excessive, but trust me: once you've tried three monitors, you'll never (voluntarily) go back to dual monitors again. Of course, the motherboard built-in video output makes it four video output ports in total.
Most monitors (I prefer the excellent 27 inch LG IPS 27MP65) have at least 2 inputs, both HDMI and VGA. The trick is to use all three HDMI outputs from the NVIDIA video card to the three HDMI monitor inputs, and also connect a VGA cable from the motherboard built-in video output to one of the monitors (preferably the least-used monitor as the NVIDIA card sees it).
If only one video input is active, your monitor should normally be able to switch to the active input (HDMI or VGA) port automatically (especially when the monitor powers up). If this sometimes fails, there should be a button labled "Input" or similar that will allow you to manually switch to the desired video input port. Remember this, in case the monitor is displaying the VGA input and what you need to see is on the HDMI input, or vice versa. If you find this problem is occurring, move the VGA cable to a monitor that is not trying to display HDMI. It is much easier if you can see all active inputs simultaneously on different monitors.
When you first install Linux (or after a kernel upgrade), the new kernel will not find the drivers for the NVIDIA video card and the built-in video output will be used. The monitor connected to the built-in VGA output should show the single-monitor display, and you'll be able to install Linux and boot up. At this point, you need to learn a few tricks.
The first trick is knowing that the NVIDIA driver cannot be installed when Linux is in the normal multi-user mode with the graphical X-Windows display active. You must boot into a single-user, text-only mode before installing the driver. On Kubuntu (my favorite) or plain Ubuntu this requires a power-off restart.
When booting, the GRUB bootloader will give you a 10-12 second countdown allowing you to select boot options before it attempts to auto-boot the newest kernel. One of the options is to type the letter "e" in order to Edit the boot options. This is what we need. Type the "e" before the countdown timer expires.
At this point, you should see a screen such as this one:

The important part is in the lower-right-hand corner, where you can see the words "quiet splash" near the end of the next-to-the-last line. The "quiet" part means that status messages to the console during boot are suppressed. The "splash" part means that the OS boots into the multi-user, graphical X-Windows mode. Both of these must be disabled in order to install the NVIDIA video driver.
Using the arrow keys, maneuver to the "quite splash" words, then use the Backspace or Delete key to remove the offending words and replace them with the single word "text". When you are done, the screen should appear like this:

You may now follow the instructions at the bottom of the screen to continue the boot with your modified boot params (e.g. Crtl-X). You should see boot status/progress messages scrolling past on your VGA-port connected monitor. Upon successful boot, the VGA-port monitor will look like this:
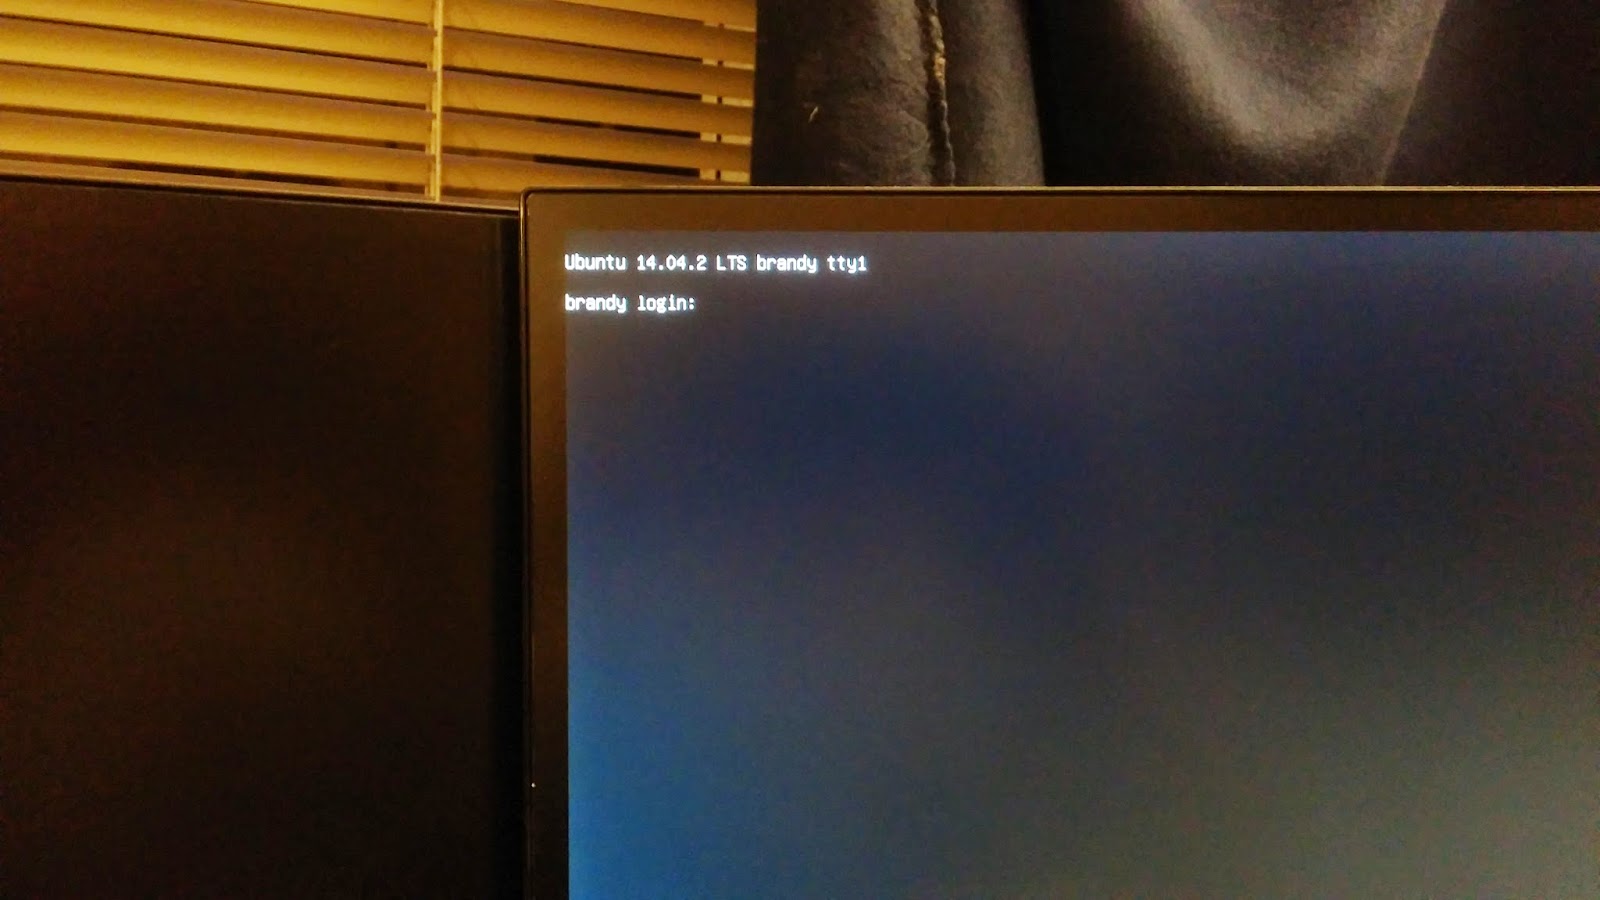
Voila! You have booted into single-user text mode. Go ahead & login and navigate to the directory containing the new video driver (typically ~/Downloads).
In this screen shot, you can see that I have three NVIDIA drivers downloaded (I keep forgetting to delete the older two). Note that I don't always download the absolute most recent driver for each OS kernel update (maybe 2-3 times/year I'll download the latest driver from the NVIDIA website). Pick the newest (or only) driver you have, and invoke it as shown with "sudo bash NVIDIA-xxxxyyyyzzz.run":

While the driver is a shell script, I find it easier to invoke it using bash rather than change permissions and invoke it directly. You need the "sudo" part since the video driver installation script must run with root permissions. At this point, the driver will use "ASCII graphics" to complete the installation process. It will stop about a half-dozen times to ask your permission for things. Use the arrow keys to highlight the "Yes" answer, then hit <return> to invoke your selection. Keep doing this until the installation is complete.
At the end of the installation, your VGA screen will be blank, and you'll be back at the command prompt. Here, we need another power-off reboot. Using "sudo poweroff" is a quick & easy way to do that.

Once the system has powered-off, hit the power button and begin a normal boot. After the GRUB timer countdown, you will likely see an "Ubuntu" splash screen for a few seconds on the VGA output. At this time, the computer should recognize your new video driver and switch to the three HDMI outputs of the video card and complete the boot process. The VGA output will be unused from here on.
If your monitor is like mine, it may be confused by having VGA input that is active for 5-10 seconds, but then dies. It keeps looking for the VGA input to come back and does not switch over the the (now active) HDMI input. You can either use the monitor's Input switch to manually switch over to the HDMI input, or perform a quick power-cycle which should cause it to recognize the active HDMI input and ignore the inactive VGA input.
That's all, folks! Happy Linuxing!
Alan Thompson
P.S. For some cool stuff that you wish was in Clojure, you may wish to visit: https://github.com/cloojure/cooljure :)
No comments:
Post a Comment